Humanoid21 (talk | contribs) No edit summary |
|||
| (21 intermediate revisions by 5 users not shown) | |||
| Line 1: | Line 1: | ||
| − | {{ |
+ | {{comic |
| − | + | | type = comic |
|
| − | + | | title = On the Edge of Armageddon |
|
| − | + | | cover image = [[file:hearts and Minds2.jpg|220px|Cover image.]] |
|
| − | + | | cover artist = [[Rob Davis]] and [[Terry Pallot]] |
|
| − | + | | series = {{sT|Deep Space Nine}} ([[Malibu DS9]]) |
|
| ⚫ | |||
| − | number = | |
||
| ⚫ | |||
| ⚫ | |||
| + | | writer = [[Mark A. Altman]] |
||
| ⚫ | |||
| − | + | | penciller = [[Rob Davis]] |
|
| + | | inker = [[Terry Pallot]] |
||
| − | artist = | |
||
| − | + | | colorist = [[Micky Rose]] |
|
| − | + | | letterer = [[Patrick Owsley]] |
|
| − | + | | editor = [[Mark Paniccia]] |
|
| ⚫ | |||
| − | letterer = [[Patrick Owsley]]| |
||
| + | | omnibus = {{dis|Hearts and Minds|collection}} |
||
| − | editor = [[Mark Paniccia]]| |
||
| ⚫ | |||
| ⚫ | |||
| ⚫ | |||
| − | omnibus = ''[[Hearts and Minds (collection)|Hearts and Minds]]''| |
||
| ⚫ | |||
| ⚫ | |||
| + | | story = |
||
| ⚫ | |||
| ⚫ | |||
| ⚫ | |||
| ⚫ | |||
| − | story = | |
||
| ⚫ | |||
| ⚫ | |||
| − | ISBN = | |
||
| ⚫ | |||
| ⚫ | |||
| − | altcover = | |
||
}} |
}} |
||
| + | '''"On the Edge of Armageddon"''' was the second issue of [[Malibu Comics]]' [[1994]] ''[[Hearts and Minds]]'' miniseries of ''[[DS9]]'' [[comic]]s. The issue consisted of 24 pages of story by [[Mark Altman]]. The art was penciled by [[Rob Davis]] and inked by [[Terry Pallot]], with [[Mark Paniccia]] credited as editor. |
||
| + | |||
==Summary== |
==Summary== |
||
===Brink of war=== |
===Brink of war=== |
||
| − | [[ |
+ | [[file:marok and Kol argue.jpg|thumb|left|Sisko, Marok, and Kol.]] |
| − | As the image of [[Tal Berel]]'s destroyed ship dominates the [[viewscreen]] in the [[conference room]] where the [[Klingon]] and [[Cardassian]] delegations were gathered. Accusations ran wild as the Klingons accused the Cardassians of destroying Berel's [[runabout]]. This culminated when [[Captain]] |
+ | As the image of [[Tal Berel]]'s destroyed ship dominates the [[viewscreen]] in the [[conference room]] where the [[Klingon]] and [[Cardassian]] delegations were gathered. Accusations ran wild as the Klingons accused the Cardassians of destroying Berel's [[runabout]]. This culminated when [[Captain]] {{dis|Kol|Captain}} threatened to kill [[Kotan Marok]] on the spot. [[Commander]] [[Benjamin Sisko]] intervened, reminding everyone that no conclusions could be drawn before an investigation. |
| − | Kol no longer wanted talks or investigation, this barbaric act was all the proof he needed and he demanded Sisko's obedience. Sisko asked if this was what he was going to say to [[ |
+ | Kol no longer wanted talks or investigation, this barbaric act was all the proof he needed and he demanded Sisko's obedience. Sisko asked if this was what he was going to say to [[chancellor of the High Council of the Klingon Empire|Chancellor]] [[Gowron, son of M'Rel|Gowron]] to justify a war that would kill millions. These words calmed Kol somewhat and he told Sisko that he would reflect on his words. |
| − | + | Marok felt a war was inevitable, but he was more interested to know who the Federation would side with; their "paper allies" the Klingons or their "Spirit Brothers" the Cardassians. Sisko tried the best he could to explain that the Federation would remain neutral in this matter and would work toward preventing the war. |
|
Meanwhile at [[Quark's]], [[Maura]] walked in to the closed commerce as [[Quark]] was sweeping the floor. She asked if they could talk, but Quark was more interested in getting her in a [[holosuite]]. Maura had other things on her mind, opening her briefcase, taking out a strip of [[latinum]] and giving it to Quark, saying she had five-hundred strips with her and a thousand more on her [[starship]] and that Quark could have it all if he sold his bar and left [[Deep Space 9]]. |
Meanwhile at [[Quark's]], [[Maura]] walked in to the closed commerce as [[Quark]] was sweeping the floor. She asked if they could talk, but Quark was more interested in getting her in a [[holosuite]]. Maura had other things on her mind, opening her briefcase, taking out a strip of [[latinum]] and giving it to Quark, saying she had five-hundred strips with her and a thousand more on her [[starship]] and that Quark could have it all if he sold his bar and left [[Deep Space 9]]. |
||
===Ongoing investigation=== |
===Ongoing investigation=== |
||
| − | [[ |
+ | [[file:uSS Orinoco (NCC-72905) in Keltara Orbit.jpg|thumb|USS Orinoco (NCC-72905).]] |
| ⚫ | ; ''[[Science officer's log, Deep Space 9|Science officer log]], [[stardate]] [[2370|47295.5]]'' : ''We have reached the [[planet]] [[Keltara]], the last planet the ''K'Tang'' was reported to have visited before being destroyed in a nearby sector of the Gamma Quadrant. [[Doctor]] [[julian Bashir|Bashir]], myself and our Klingon attache [[Koleth]], are being beamed down to the surface to question the Klingons that were left there.'' |
||
| − | '''''[[Science officer]] [[log]] [[Stardate|Stardate 47295.5]]''''' |
||
| ⚫ | :''We have reached the [[planet]] [[Keltara]], the last planet the ''K'Tang'' was reported to have visited before being destroyed in a nearby sector of the Gamma Quadrant. [[Doctor |
||
After the landing party had beamed to the surface of the planet, [[Lieutenant commander]] [[Jadzia Dax|Dax]]'s [[tricorder]] picked up signs of a Klingon camp east of their position. The tricorder also picked up an usual reading but before it could identified, a large purple furred beast jumped out of a snow bank and rushed straight towards Bashir. As it was about to strike a [[disruptor]] beam hit it in the chest and brought it down. When they turned around they saw that the shot had come from a Klingon on top of a small hill. |
After the landing party had beamed to the surface of the planet, [[Lieutenant commander]] [[Jadzia Dax|Dax]]'s [[tricorder]] picked up signs of a Klingon camp east of their position. The tricorder also picked up an usual reading but before it could identified, a large purple furred beast jumped out of a snow bank and rushed straight towards Bashir. As it was about to strike a [[disruptor]] beam hit it in the chest and brought it down. When they turned around they saw that the shot had come from a Klingon on top of a small hill. |
||
| − | Bashir tried to thank the Klingon, but he was more interested to know why these [[Human]]s had interrupted their [[shore leave]]. Koleth told him that the {{IKS|K'Tang}} had been destroyed. The Klingon led the team to the settlement. On their way there Dax advised Bashir to watch what he said |
+ | Bashir tried to thank the Klingon, but he was more interested to know why these [[Human]]s had interrupted their [[shore leave]]. Koleth told him that the {{IKS|K'Tang}} had been destroyed. The Klingon led the team to the settlement. On their way there Dax advised Bashir to watch what he said to these Klingons as they take there shore leave very seriously and if offended, "''They might just serve you your tongue on stick.''" At the camp, the Klingon reported the news of the ''K'Tang''{{'}}s destruction and Dax explained that the [[Klingon Empire|Empire]] suspected the Cardassians were responsible. |
The commander seemed to find that possibility ridiculous, but Koleth confirmed Dax's comments. He explained that a secret Klingon [[listening post]] had picked up the last transmission of the ''K'Tang'' stating that their aggressors were Cardassian and that their [[shield]]s and weapons had been sabotaged. The Klingon Commander introduced his troops and all were present except for [[Garok]] and [[Katon]], both off on scouting duty. He believed that none of them would have betrayed the ship and Captain [[Krek]]. Dax explained their reason for being there was not to accuse them rather to learn the next destination of the ''K'Tang'' as its captain hadn't filed a flight path. The commander told Dax that the [[crew]] of the ''K'Tang'' were looking for supplies and information and the only place to get it in the Gamma Quadrant, [[Caldonia III]]. |
The commander seemed to find that possibility ridiculous, but Koleth confirmed Dax's comments. He explained that a secret Klingon [[listening post]] had picked up the last transmission of the ''K'Tang'' stating that their aggressors were Cardassian and that their [[shield]]s and weapons had been sabotaged. The Klingon Commander introduced his troops and all were present except for [[Garok]] and [[Katon]], both off on scouting duty. He believed that none of them would have betrayed the ship and Captain [[Krek]]. Dax explained their reason for being there was not to accuse them rather to learn the next destination of the ''K'Tang'' as its captain hadn't filed a flight path. The commander told Dax that the [[crew]] of the ''K'Tang'' were looking for supplies and information and the only place to get it in the Gamma Quadrant, [[Caldonia III]]. |
||
| Line 54: | Line 51: | ||
Quark and [[Rom]] are sitting at a table at the back of the bar. Quark explained details of a plan to get the latinum off Maura's ship; Quark would entertain Maura over diner, while Rom would find a way on board her ship and steal the latinum that remained. |
Quark and [[Rom]] are sitting at a table at the back of the bar. Quark explained details of a plan to get the latinum off Maura's ship; Quark would entertain Maura over diner, while Rom would find a way on board her ship and steal the latinum that remained. |
||
| − | Later in the evening, on the [[Seltari |
+ | Later in the evening, on the [[Arvas|Seltari ship]], Quark and Maura are enjoying a candlelight dinner, he tried to begin with pleasantries to little effect. She jumped right down to business and wanted to know what decision Quark had reached. Quark tried to explain that he had sentimental value attachment as well friends he was not willing to give up. Maura was rather surprised that a [[Ferengi]] would place friends over profit and then one of Maura's officer walked in holding Rom by his collar. |
| − | [[ |
+ | [[file:odo and O'Brien in docking bay 5.jpg|thumb|Odo and O'Brien in docking bay 5.]] |
| − | At the same time, Odo met with [[ |
+ | At the same time, Odo met with [[Chief]] [[miles O'Brien|O'Brien]] who was investigating the debris from the runabout. His assistant had ran a level 3 diagnostic a week earlier on all runabouts and the analysis of the debris showed no malfunction, thus the ship must have carried a [[bomb]]. The location of the explosion suggested that someone on the station or a nearby ship could have activated the device. |
Maura and her companion escorted the Ferengi brothers back took the bar, Maura gave Quark a final offer, 2500 bars of latinum, she would expect his answer in the morning. As Quark expressed his frustration to Rom about their failure, Odo who had walked in unnoticed and caught the end of the conversation. When Quark was asked what was meant, he pointed out that Odo misunderstood what was being said. Occupied by more important matters, Odo questioned Quark on the "Betrel incident", but Quark had nothing to hide as he knew nothing on the subject. |
Maura and her companion escorted the Ferengi brothers back took the bar, Maura gave Quark a final offer, 2500 bars of latinum, she would expect his answer in the morning. As Quark expressed his frustration to Rom about their failure, Odo who had walked in unnoticed and caught the end of the conversation. When Quark was asked what was meant, he pointed out that Odo misunderstood what was being said. Occupied by more important matters, Odo questioned Quark on the "Betrel incident", but Quark had nothing to hide as he knew nothing on the subject. |
||
===Retracing the ''K'Tang''=== |
===Retracing the ''K'Tang''=== |
||
| + | [[file:cardassian assistant.jpg|thumb|left|A Cardassian is thrown through a window.]] |
||
| − | + | On the ''Oricono'' Bashir discussed Caldonia III and his impression of Keltara with Dax, while Koleth went about his battle meditation. Bashir walked in on Koleth as he finished up and asked if he was expecting a battle, pointing out that as a healer he never understood the need for it. Koleth answered that he could not understand for the simple fact that he was Human. Dax's voice announced they had arrived in [[orbit]] of Caldonia III. |
|
| − | + | Back on the DS9 [[Promenade]], Marok, Dukat, and his assistant are returning to the conference room when they are approached by three aggressive Klingons. The Cardassians try to pass by quietly but one of the Klingons grabs Marok's assistant and throws him through a shop window. He then pulls out his ''[[d'k tahg]]'' intending to finish off Dukat and Marok but is stopped by Kira's drawn [[phaser]]. Dukat thanks the Major noting the irony of her saving his life after she tried to kill him two years ago. |
|
| − | On the surface of Caldonia, Dax, Bashir and Koleth walk about when Dax suggest a certain bar where they might get the information they are looking for. Once inside, they ask the barkeep if he |
+ | On the surface of Caldonia, Dax, Bashir, and Koleth walk about when Dax suggest a certain bar where they might get the information they are looking for. Once inside, they ask the barkeep if he has seen any Klingons. He says no but points to a Ferengi named [[Zemel]] sitting at a table with an [[Andorian]]. When asked about the whereabouts of the ''K'Tang''{{'}}s crew he tells Dax that he does not know but can point them to someone who does. |
| − | They arrive to another building where Dax asks Koleth to stay outside and watch their backs. Once they entered they find |
+ | They arrive to another building where Dax asks Koleth to stay outside and watch their backs. Once they entered they find [[Mavok Bev Nareen]], a red skinned alien native to the Gamma quadrant, surrounded by four dancers. They question him about the ''K'Tang'' and he tells them all that he knows. He explains that after enjoying the local entertainment, and acquiring some [[Romulan ale]] and a "non-essential". They departed towards the [[Sector G17]] where [[Abyss (region)|The Abyss]] is located. He explains to Bashir that the Abyss is a part of space avoided by all who reside in the Gamma Quadrant because it is where the spirit of the dead go to rest and that it is protected by a giant bird created by the god [[Bahal]]. |
| + | [[file:maura's death threat.jpg|thumb|Maura threatens Quark.]] |
||
| − | In Quark's quarter, the shadow of Maura |
+ | In Quark's quarter, the shadow of Maura falls across Quark's sleeping body. She wakes him up asking if he has made a decision. When he responds in the negative, she tells him that he either signs the bar over tonight or dies in the morning… |
| − | :''To be |
+ | :''[[Into the Abyss|To be continued…]]'' |
| − | |||
| − | |||
| − | |||
| − | {{stub-comic}} |
||
==References== |
==References== |
||
===Characters=== |
===Characters=== |
||
| − | :[[Julian Bashir]] • [[Jadzia Dax]] • [[Skrain Dukat|Dukat]] • [[Kernwill]] • [[Kira Nerys]] • |
+ | :[[Julian Bashir]] • [[Jadzia Dax]] • [[Skrain Dukat|Dukat]] • [[Kernwill]] • [[Kira Nerys]] • {{dis|Kol|Captain}} • [[Koleth]] • [[Kotan Marak]] • [[Maura]] • [[Mavok Bev Nareen]] • [[Miles O'Brien]] • [[Odo]] • [[Quark]] • [[Rom]] • [[Benjamin Sisko]] • [[Zemel]] |
| − | {{ref}} [[Tal Berel]] • [[Gowron]] • [[Krek]] • [[Sarek]] |
+ | {{ref}} [[Bahal]] • [[Tal Berel]] • [[Gowron]] • [[Krek]] • [[Sarek]] |
| + | |||
===Locations=== |
===Locations=== |
||
:[[Caldonia]] • [[Caldonia III]] • [[Deep Space 9]] • [[Gamma Quadrant]] • [[Keltara]] • [[Quark's]] |
:[[Caldonia]] • [[Caldonia III]] • [[Deep Space 9]] • [[Gamma Quadrant]] • [[Keltara]] • [[Quark's]] |
||
| − | {{ref}} {{dis|Abyss| |
+ | {{ref}} {{dis|Abyss|region}} |
| + | |||
| ⚫ | |||
| + | ===Races and cultures=== |
||
| − | :[[Andorian]] • [[Bajoran]] • [[Cardassian]] • [[Changeling]] • [[Ferengi]] • [[Human]] • [[Klingon]] • [[Trill]] |
+ | :[[Andorian]] • [[Bajoran]] • [[Cardassian]] • [[Changeling]] • [[Ferengi]] • [[Human]] • [[Klingon]] • [[Seltari]] • [[Trill]] |
{{ref}} [[Betazoid]] • [[Vulcan]] |
{{ref}} [[Betazoid]] • [[Vulcan]] |
||
| ⚫ | |||
| ⚫ | |||
| − | {{ref}} {{USS|Enterprise|NCC-1701-D}} • {{IKS|K'Tang}} |
||
| ⚫ | |||
| ⚫ | |||
| ⚫ | |||
| ⚫ | |||
| ⚫ | |||
| ⚫ | |||
| ⚫ | |||
| ⚫ | |||
| + | {{ref}} {{uSS|Enterprise|NCC-1701-D}} ({{class|Galaxy}} [[explorer]]) • {{iKS|K'Tang}} ({{class|Vor'cha}} [[attack cruiser]]) |
||
| ⚫ | |||
| − | {{Timeline| |
||
| ⚫ | |||
| ⚫ | |||
| ⚫ | |||
| ⚫ | |||
| ⚫ | |||
| ⚫ | |||
| ⚫ | |||
| ⚫ | |||
| ⚫ | |||
| ⚫ | |||
| ⚫ | |||
| ⚫ | |||
| ⚫ | |||
| ⚫ | |||
| ⚫ | |||
| + | ==Appendices== |
||
| ⚫ | |||
| + | ===Background=== |
||
| ⚫ | |||
| + | * Only issue in the series not to feature [[Morn]]. |
||
| ⚫ | |||
| ⚫ | |||
| ⚫ | |||
| ⚫ | |||
| ⚫ | |||
| ⚫ | |||
| + | <gallery captionalign="left"> |
||
| ⚫ | |||
| + | file:hearts and Minds2.jpg|Cover image. |
||
| ⚫ | |||
| + | file:marok and Kol argue.jpg|Sisko, Marok, and Kol. |
||
| ⚫ | |||
| + | file:uSS Orinoco (NCC-72905) in Keltara Orbit.jpg|USS ''Orinoco'' (NCC-72905). |
||
| ⚫ | |||
| + | file:odo and O'Brien in docking bay 5.jpg|Odo and O'Brien in docking bay 5. |
||
| + | file:cardassian assistant.jpg|A Cardassian is thrown through a window. |
||
| + | file:maura's death threat.jpg|Maura threatens Quark. |
||
| + | file:mavok bev nareen in 2370.jpg|Mavok Bev Nareen. |
||
| + | Admiral kernwill alt Malibu.jpg|Admiral Kernwill in 2370 |
||
| + | </gallery> |
||
| + | ===Connections=== |
||
| ⚫ | |||
| + | {{hearts and Minds}} |
||
| ⚫ | |||
| + | {{timeline |
||
| − | prevMB= {{small|[[Hearts and Minds]]}}<br>[[For the Glory of the Empire]]| |
||
| ⚫ | |||
| − | nextMB= {{small|[[Hearts and Minds]]}}<br>[[Into the Abyss]]| |
||
| ⚫ | |||
| ⚫ | |||
| ⚫ | |||
| ⚫ | |||
| ⚫ | |||
| ⚫ | |||
| ⚫ | |||
| ⚫ | |||
| ⚫ | |||
| ⚫ | |||
| ⚫ | |||
| ⚫ | |||
| ⚫ | |||
| ⚫ | |||
| ⚫ | |||
| ⚫ | |||
| ⚫ | |||
| ⚫ | |||
| ⚫ | |||
| ⚫ | |||
| ⚫ | |||
| ⚫ | |||
| ⚫ | |||
| ⚫ | |||
| + | | prevMB = [[For the Glory of the Empire]]{{bsmall|[[Hearts and Minds]]}} |
||
| + | | nextMB = [[Into the Abyss]]{{bsmall|[[Hearts and Minds]]}} |
||
| ⚫ | |||
| + | | adbefore1 = [[For the Glory of the Empire]]{{bsmall|[[Hearts and Minds]]}} |
||
| ⚫ | |||
| ⚫ | |||
| ⚫ | |||
| ⚫ | |||
| ⚫ | |||
| ⚫ | |||
| ⚫ | |||
| ⚫ | |||
| ⚫ | |||
| ⚫ | |||
| ⚫ | |||
| − | adbefore1= {{small|[[Hearts and Minds]]}}<br>[[For the Glory of the Empire]]| |
||
| ⚫ | |||
| ⚫ | |||
| − | |||
| ⚫ | |||
| ⚫ | |||
| ⚫ | |||
| − | |||
| ⚫ | |||
| ⚫ | |||
| ⚫ | |||
| ⚫ | |||
| ⚫ | |||
| − | [[Category:DS9 comics]] |
||
Revision as of 04:39, 19 November 2018
"On the Edge of Armageddon" was the second issue of Malibu Comics' 1994 Hearts and Minds miniseries of DS9 comics. The issue consisted of 24 pages of story by Mark Altman. The art was penciled by Rob Davis and inked by Terry Pallot, with Mark Paniccia credited as editor.
Summary
Brink of war

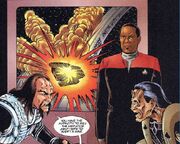
Sisko, Marok, and Kol.
As the image of Tal Berel's destroyed ship dominates the viewscreen in the conference room where the Klingon and Cardassian delegations were gathered. Accusations ran wild as the Klingons accused the Cardassians of destroying Berel's runabout. This culminated when Captain Kol threatened to kill Kotan Marok on the spot. Commander Benjamin Sisko intervened, reminding everyone that no conclusions could be drawn before an investigation.
Kol no longer wanted talks or investigation, this barbaric act was all the proof he needed and he demanded Sisko's obedience. Sisko asked if this was what he was going to say to Chancellor Gowron to justify a war that would kill millions. These words calmed Kol somewhat and he told Sisko that he would reflect on his words.
Marok felt a war was inevitable, but he was more interested to know who the Federation would side with; their "paper allies" the Klingons or their "Spirit Brothers" the Cardassians. Sisko tried the best he could to explain that the Federation would remain neutral in this matter and would work toward preventing the war.
Meanwhile at Quark's, Maura walked in to the closed commerce as Quark was sweeping the floor. She asked if they could talk, but Quark was more interested in getting her in a holosuite. Maura had other things on her mind, opening her briefcase, taking out a strip of latinum and giving it to Quark, saying she had five-hundred strips with her and a thousand more on her starship and that Quark could have it all if he sold his bar and left Deep Space 9.
Ongoing investigation
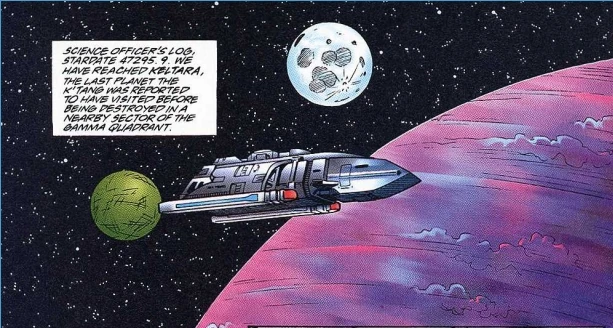
USS Orinoco (NCC-72905).
- Science officer log, stardate 47295.5
- We have reached the planet Keltara, the last planet the K'Tang was reported to have visited before being destroyed in a nearby sector of the Gamma Quadrant. Doctor Bashir, myself and our Klingon attache Koleth, are being beamed down to the surface to question the Klingons that were left there.
After the landing party had beamed to the surface of the planet, Lieutenant commander Dax's tricorder picked up signs of a Klingon camp east of their position. The tricorder also picked up an usual reading but before it could identified, a large purple furred beast jumped out of a snow bank and rushed straight towards Bashir. As it was about to strike a disruptor beam hit it in the chest and brought it down. When they turned around they saw that the shot had come from a Klingon on top of a small hill.
Bashir tried to thank the Klingon, but he was more interested to know why these Humans had interrupted their shore leave. Koleth told him that the IKS K'Tang had been destroyed. The Klingon led the team to the settlement. On their way there Dax advised Bashir to watch what he said to these Klingons as they take there shore leave very seriously and if offended, "They might just serve you your tongue on stick." At the camp, the Klingon reported the news of the K'Tang's destruction and Dax explained that the Empire suspected the Cardassians were responsible.
The commander seemed to find that possibility ridiculous, but Koleth confirmed Dax's comments. He explained that a secret Klingon listening post had picked up the last transmission of the K'Tang stating that their aggressors were Cardassian and that their shields and weapons had been sabotaged. The Klingon Commander introduced his troops and all were present except for Garok and Katon, both off on scouting duty. He believed that none of them would have betrayed the ship and Captain Krek. Dax explained their reason for being there was not to accuse them rather to learn the next destination of the K'Tang as its captain hadn't filed a flight path. The commander told Dax that the crew of the K'Tang were looking for supplies and information and the only place to get it in the Gamma Quadrant, Caldonia III.
Ongoing negotiations
Back on the station, Sisko reviewed the situation with Admiral Kernwill, who inquired about Odo's progress on death of Berel. Unfortunately with no leads and time running short, Kernwill advised Sisko that he would have to take over the negotiations and that the USS Enterprise-D had been diverted to Deep Space 9, but wound not be there for three days. Major Kira entered the office, and noticing Sisko's look, asked what had happened, he explained his orders and wished for a prayer from the Prophets.
Quark and Rom are sitting at a table at the back of the bar. Quark explained details of a plan to get the latinum off Maura's ship; Quark would entertain Maura over diner, while Rom would find a way on board her ship and steal the latinum that remained.
Later in the evening, on the Seltari ship, Quark and Maura are enjoying a candlelight dinner, he tried to begin with pleasantries to little effect. She jumped right down to business and wanted to know what decision Quark had reached. Quark tried to explain that he had sentimental value attachment as well friends he was not willing to give up. Maura was rather surprised that a Ferengi would place friends over profit and then one of Maura's officer walked in holding Rom by his collar.

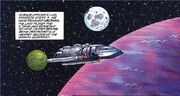
Odo and O'Brien in docking bay 5.
At the same time, Odo met with Chief O'Brien who was investigating the debris from the runabout. His assistant had ran a level 3 diagnostic a week earlier on all runabouts and the analysis of the debris showed no malfunction, thus the ship must have carried a bomb. The location of the explosion suggested that someone on the station or a nearby ship could have activated the device.
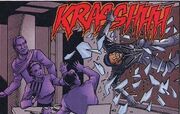
Maura and her companion escorted the Ferengi brothers back took the bar, Maura gave Quark a final offer, 2500 bars of latinum, she would expect his answer in the morning. As Quark expressed his frustration to Rom about their failure, Odo who had walked in unnoticed and caught the end of the conversation. When Quark was asked what was meant, he pointed out that Odo misunderstood what was being said. Occupied by more important matters, Odo questioned Quark on the "Betrel incident", but Quark had nothing to hide as he knew nothing on the subject.
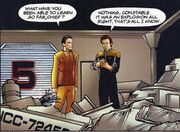
Retracing the K'Tang

A Cardassian is thrown through a window.
On the Oricono Bashir discussed Caldonia III and his impression of Keltara with Dax, while Koleth went about his battle meditation. Bashir walked in on Koleth as he finished up and asked if he was expecting a battle, pointing out that as a healer he never understood the need for it. Koleth answered that he could not understand for the simple fact that he was Human. Dax's voice announced they had arrived in orbit of Caldonia III.
Back on the DS9 Promenade, Marok, Dukat, and his assistant are returning to the conference room when they are approached by three aggressive Klingons. The Cardassians try to pass by quietly but one of the Klingons grabs Marok's assistant and throws him through a shop window. He then pulls out his d'k tahg intending to finish off Dukat and Marok but is stopped by Kira's drawn phaser. Dukat thanks the Major noting the irony of her saving his life after she tried to kill him two years ago.
On the surface of Caldonia, Dax, Bashir, and Koleth walk about when Dax suggest a certain bar where they might get the information they are looking for. Once inside, they ask the barkeep if he has seen any Klingons. He says no but points to a Ferengi named Zemel sitting at a table with an Andorian. When asked about the whereabouts of the K'Tang's crew he tells Dax that he does not know but can point them to someone who does.
They arrive to another building where Dax asks Koleth to stay outside and watch their backs. Once they entered they find Mavok Bev Nareen, a red skinned alien native to the Gamma quadrant, surrounded by four dancers. They question him about the K'Tang and he tells them all that he knows. He explains that after enjoying the local entertainment, and acquiring some Romulan ale and a "non-essential". They departed towards the Sector G17 where The Abyss is located. He explains to Bashir that the Abyss is a part of space avoided by all who reside in the Gamma Quadrant because it is where the spirit of the dead go to rest and that it is protected by a giant bird created by the god Bahal.
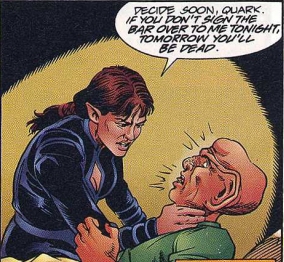

Maura threatens Quark.
In Quark's quarter, the shadow of Maura falls across Quark's sleeping body. She wakes him up asking if he has made a decision. When he responds in the negative, she tells him that he either signs the bar over tonight or dies in the morning…
References
Characters
- Julian Bashir • Jadzia Dax • Dukat • Kernwill • Kira Nerys • Kol • Koleth • Kotan Marak • Maura • Mavok Bev Nareen • Miles O'Brien • Odo • Quark • Rom • Benjamin Sisko • Zemel
- Referenced only
- Bahal • Tal Berel • Gowron • Krek • Sarek
Locations
- Caldonia • Caldonia III • Deep Space 9 • Gamma Quadrant • Keltara • Quark's
- Referenced only
- Abyss
Races and cultures
- Andorian • Bajoran • Cardassian • Changeling • Ferengi • Human • Klingon • Seltari • Trill
- Referenced only
- Betazoid • Vulcan
Starships and vehicles
- USS Orinoco (Danube-class runabout)
- Referenced only
- USS Enterprise (Galaxy-class explorer) • IKS K'Tang (Vor'cha-class attack cruiser)
States and organizations
Other references
- gold pressed latinum • holosuite • Romulan ale • shore leave • Varook
Appendices
Background
- Only issue in the series not to feature Morn.
Images
")
")
_in_Keltara_Orbit.jpg "USS Orinoco (NCC-72905) in Keltara Orbit.jpg (173 KB)")
")
")
")
")
")
Connections
| Hearts and Minds | ||||||||||||||||||||||||||||||||||||||||||||||
|---|---|---|---|---|---|---|---|---|---|---|---|---|---|---|---|---|---|---|---|---|---|---|---|---|---|---|---|---|---|---|---|---|---|---|---|---|---|---|---|---|---|---|---|---|---|---|
| "Prelude" • "For the Glory of the Empire" • "On the Edge of Armageddon" • "Into the Abyss" • "Masters of War" | ||||||||||||||||||||||||||||||||||||||||||||||
| published order | ||
|---|---|---|
| Previous comic: For the Glory of the Empire |
DS9 comics Hearts and Minds |
Next comic: Into the Abyss |
| chronological order | ||
| Previous Adventure: For the Glory of the Empire Hearts and Minds |
Memory Beta Chronology | Next Adventure: Into the Abyss Hearts and Minds |
| Previous Adventure: For the Glory of the Empire Hearts and Minds |
Deep Space Nine Adventures | Next Adventure: Into the Abyss Hearts and Minds |
External link
- On the Edge of Armageddon article at Memory Alpha, the wiki for canon Star Trek.